3D Secure 2.0 API integration
This guide will show you how to integrate the 3D Secure 2.0 (3DS 2.0) payment flows into your standard integration using our unified payments API.
Integration options
There are two methods you can use to support 3DS 2.0 payments within your integration:
Hosted solution: Request a 3DS 2.0 payment with a card token
Our hosted solution allows you to simply submit a payment request with "3ds.enabled": true, and then we'll redirect your customer to a Checkout.com page to gather all the 3DS 2.0-relevant data and add the required fields to your request – meaning no extra work for you.
Step 1: Collect a card token
First, the customer needs to exchange their card details for a card token – tokenization. You can create a card token with one of our integration options.
Step 2: Create a card token payment request
Once you've got a card token, you can request a payment using the request a card payment endpoint.
The only difference between a standard card token payment and a 3DS one is the 3ds object. Set the enabled field to true to request a 3DS 2.0 payment.
You can see an example of a request below:
Downgrade a 3DS transaction
If you want to automatically attempt a transaction as non-3DS, use theattempt_n3dfield.
{
  "source": {
    "type": "token",
    "token":"tok_f6z4mnoububudpqnvhwa5ff27u"
  },
  "amount": 2000,
  "currency": "USD",
  "3ds": {
    "enabled": true
  }
}3DS test cards
If you want to test 3DS authentication flows and transaction statuses in the sandbox environment, use our test cards.
Step 3: Redirect your customer
If the card is enrolled for 3DS 2.0, you'll receive a 202 - Accepted response containing a redirect link to which you should redirect your customer.
{
  "id": "pay_hehfmlkpykeupofyxf7nbr6yyy",
  "status": "Pending",
  "customer": {
    "id": "cus_u4a4zosnrw7ehhzr7jipbkdzo4"
  },
  "3ds": {
    "downgraded": false,
    "enrolled": "Y"
  },
  "_links": {
    "self": {
      "href": "https://api.sandbox.checkout.com/payments/pay_hehfmlkpykeupofyxf7nbr6yyy"
    },
    "redirect": {
      "href": "https://sandbox.checkout.com/api2/v2/3ds/acs/sid_feixbit6us3utfedjulm6egnsu"
    }
  }
}
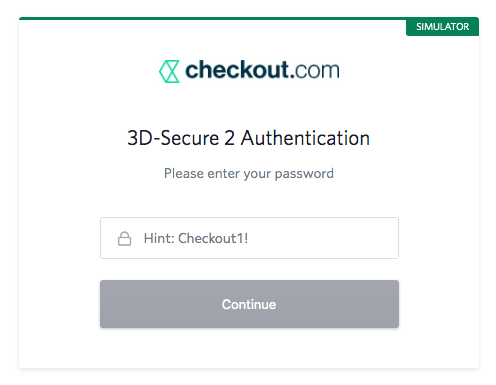
The customer may then be prompted to verify their identity — generally with a password.
Redirection URLs
You can configure redirection success and redirection failure URLs in your Hub dashboard or in the payment request itself by setting thesuccess_urlandfailure_urlfields.
Step 4: Verify the payment with the session ID
When the customer is redirected back to your site, a cko-session-id querystring parameter is provided at the end of the success URL. It'll look something like this:
http://example.com/success?*cko-session-id=sid_ubfj2q76miwundwlk72vxt2i7q*
Once you've got the cko-session-id, you can use our get payment details API to determine whether the payment was approved.
Thecko-session-idexpires 15 minutes after being created.
Endpoints
Live
Sandbox
Header and path parameters
Header | Value |
|---|---|
|
|
|
|
Path | Value |
|---|---|
| The |
Use the approved field to check whether or not the authorization was successful ("approved": true). If your authorization was not successful, it's possible the payment used an invalid/expired card, or a valid card with an insufficient available balance.
The response includes anactionsobject, which only applies to 3D Secure payments. It gives you a summary of all the actions performed for that payment. This allows you to obtain the response code of the authorization if it was declined.
{
  "id": "pay_y3oqhf46pyzuxjbcn2giaqnb44",
  "requested_on": "2019-01-16T22:08:06Z",
  "source": {
    "type": "card",
    "id": "src_wmlfc3zyhqzehihu7giusaaawu",
  },
  "amount": 6540,
  "currency": "USD",
  "approved": false,
  "status": "Declined",
  "3ds": {
    "downgraded": false,
    "authentication_response": "Y",
    "cryptogram": "hv8mUFzPzRZoCAAAAAEQBDMAAAA=",
    "xid": "89936bf2-e971-49e5-b82c-6656bab50870",
    "version": "2.1.0"
  },
  "eci": "06",
  "actions": [
    {
      "id": "act_y3oqhf46pyzuxjbcn2giaqnb44",
      "type": "Authorization",
      "response_code": "20005",
      "response_summary": "Declined - Do Not Honour"
    }
  ],
  "_links": {
    "self": {
      "href": "https://api.checkout.com/payments/pay_y3oqhf46pyzuxjbcn2giaqnb44"
    },
    "actions": {
      "href": "https://api.checkout.com/payments/pay_y3oqhf46pyzuxjbcn2giaqnb44/actions"
    }
  }
}
Custom solution: Request a 3DS 2.0 payment with a card token
If you want full control over the processing of 3DS 2.0 payments, you can create your own integration with our JavaScript software development kit (SDK).
You'll have to include the 3DS 2.0 method, device information and challenge in your payment request, as well as handling identity challenges when necessary.
Below, you'll find examples of both the frictionless and challenge payment flows.
Frictionless flow example
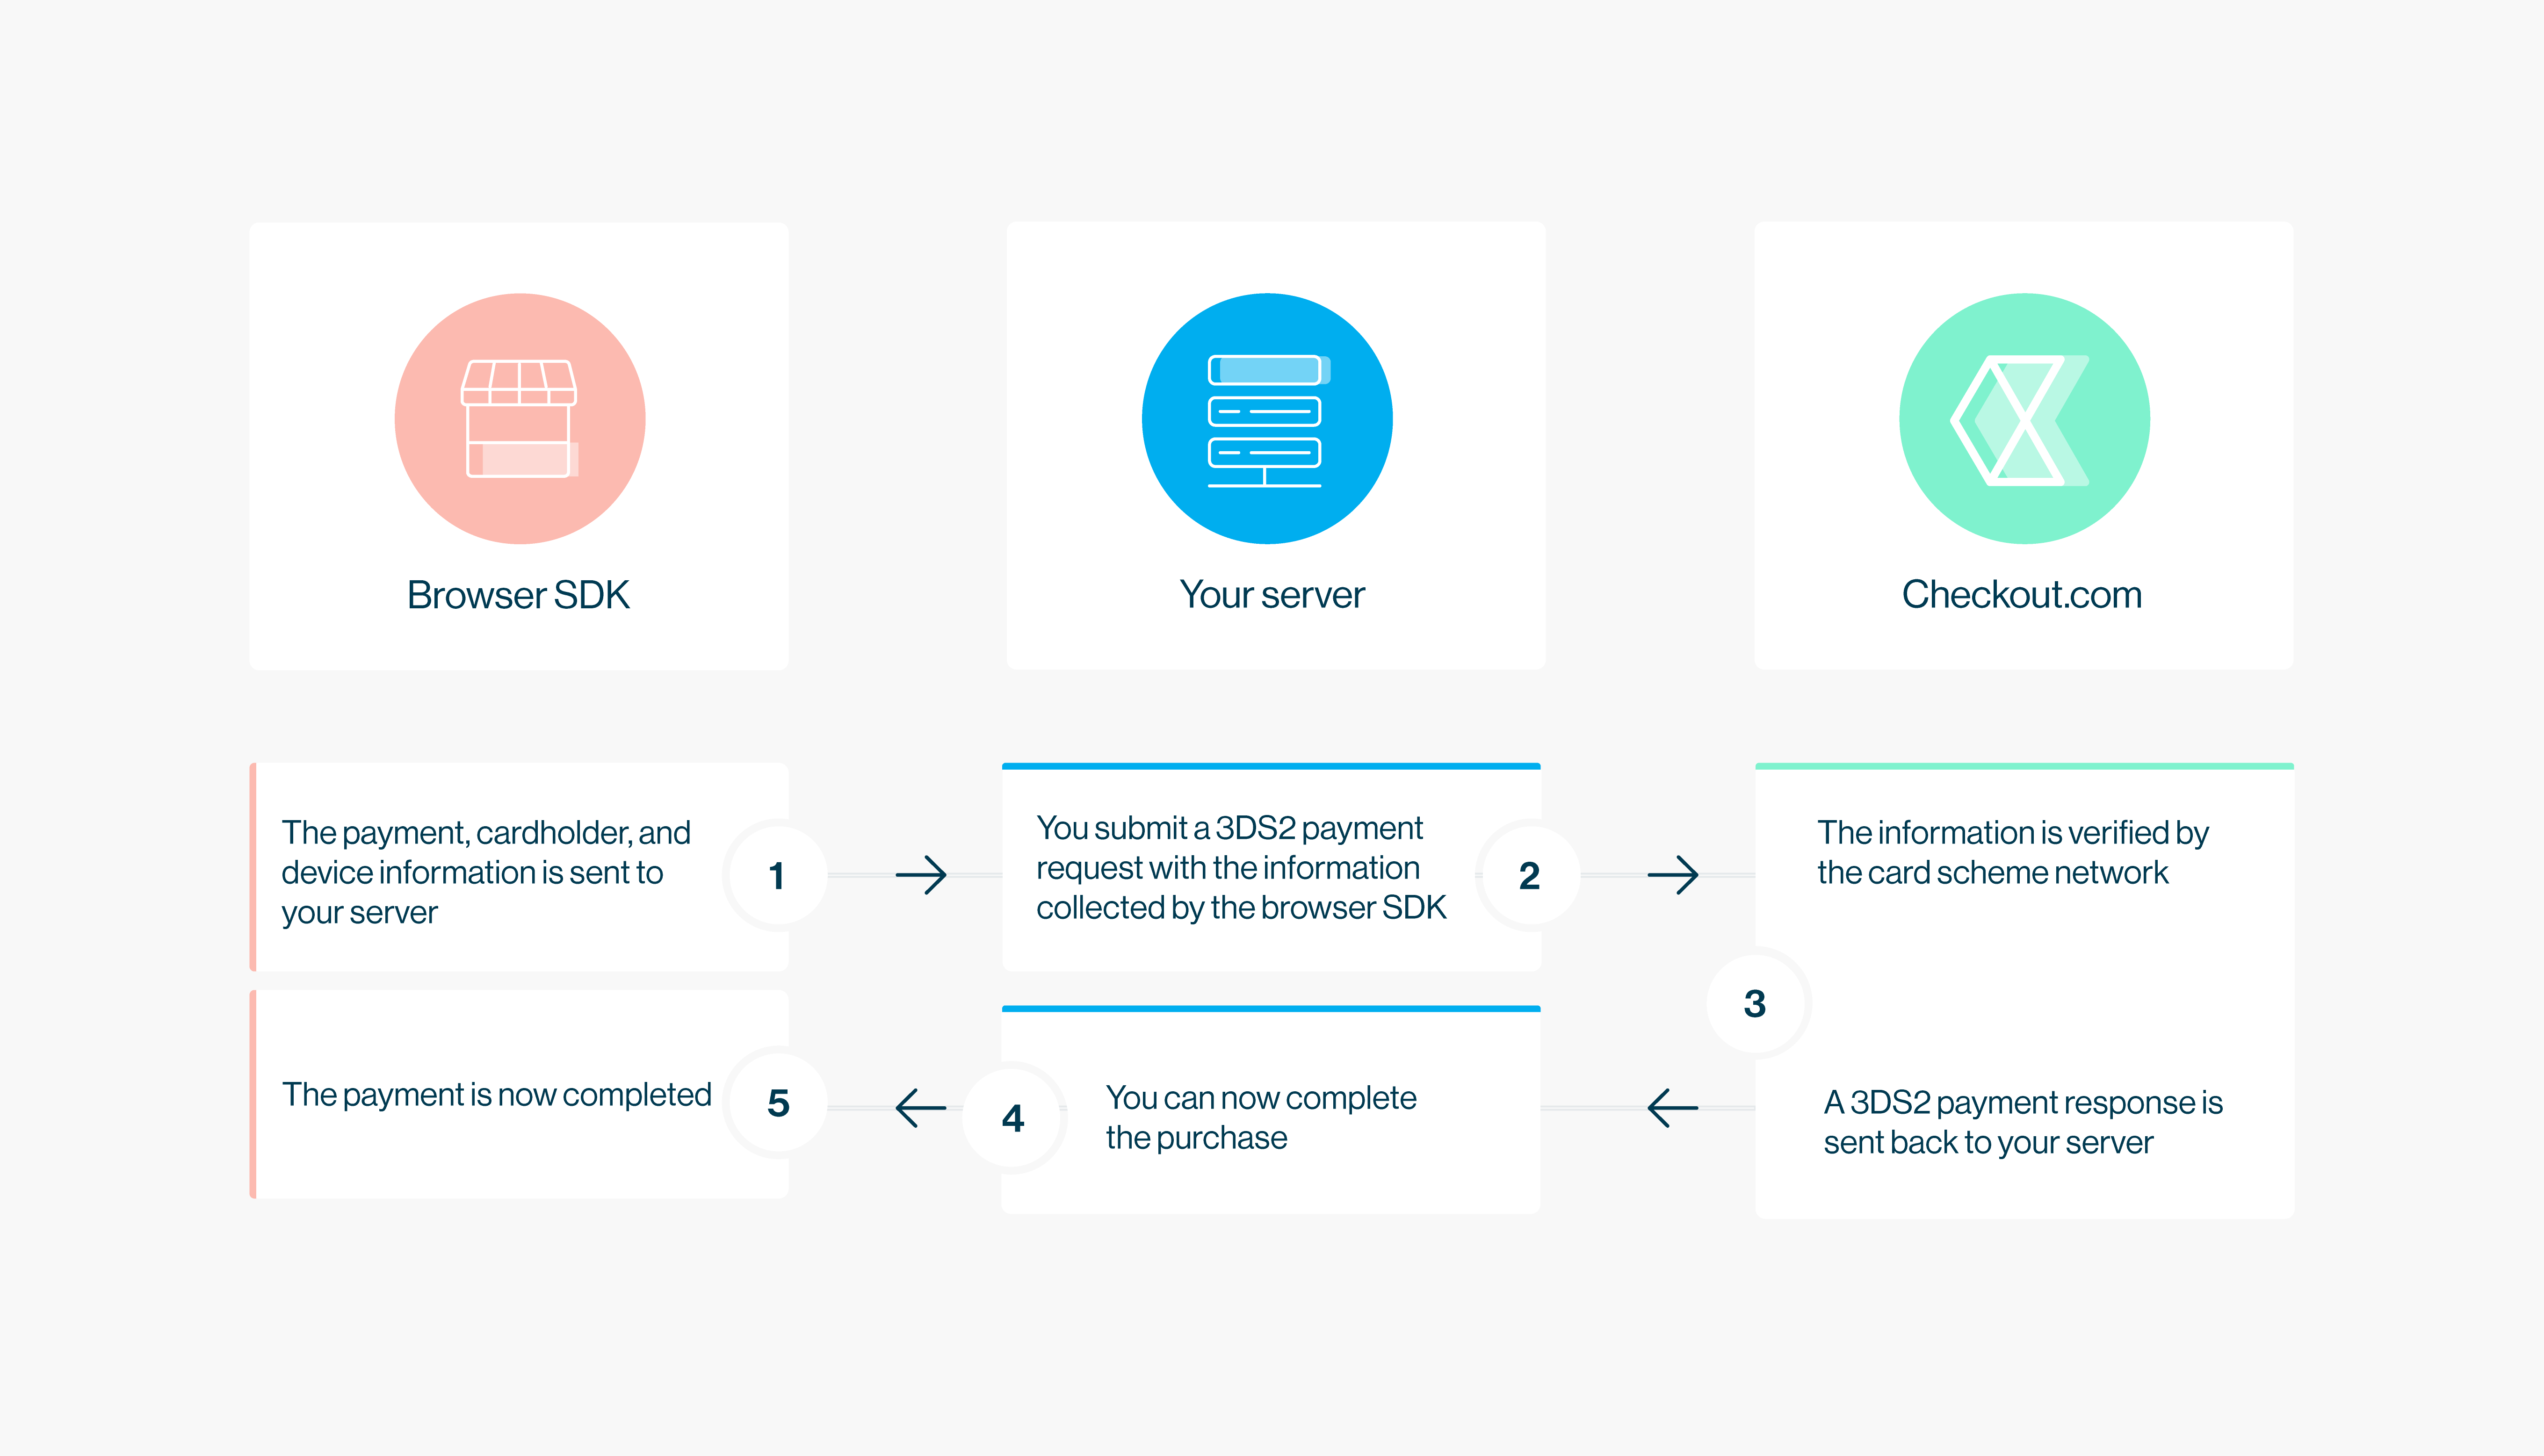
Click to enlarge.
Step 1: Collect a card token
First, the customer needs to exchange their card details for a card token – tokenization. You can create a card token with one of our integration options.
Step 2: Submit a payment request
Once you've got a card token, you can request a payment using the request a card payment endpoint.
The only difference between a standard card token payment and a 3DS one is the 3ds object. Set the enabled field to true to request a 3DS 2.0 payment.
You can see an example of a request below:
Downgrade a 3DS transaction
If you want to automatically attempt a transaction as non-3DS, use theattempt_n3dfield.
{
  "source": {
    "type": "token",
    "token":"tok_f6z4mnoububudpqnvhwa5ff27u"
  },
  "amount": 2000,
  "currency": "USD",
  "3ds": {
    "enabled": true
  }
}3DS test cards
If you want to test 3DS authentication flows and transaction statuses in the sandbox environment, use our test cards.
If the authentication is successful, you'll receive a 201 Created response. Use the approved field to check whether or not the authorization was successful ("approved": true).
If your authorization was not successful, the cardholder may have used an invalid/expired card, or a valid card with an insufficient available balance.
Challenge flow example
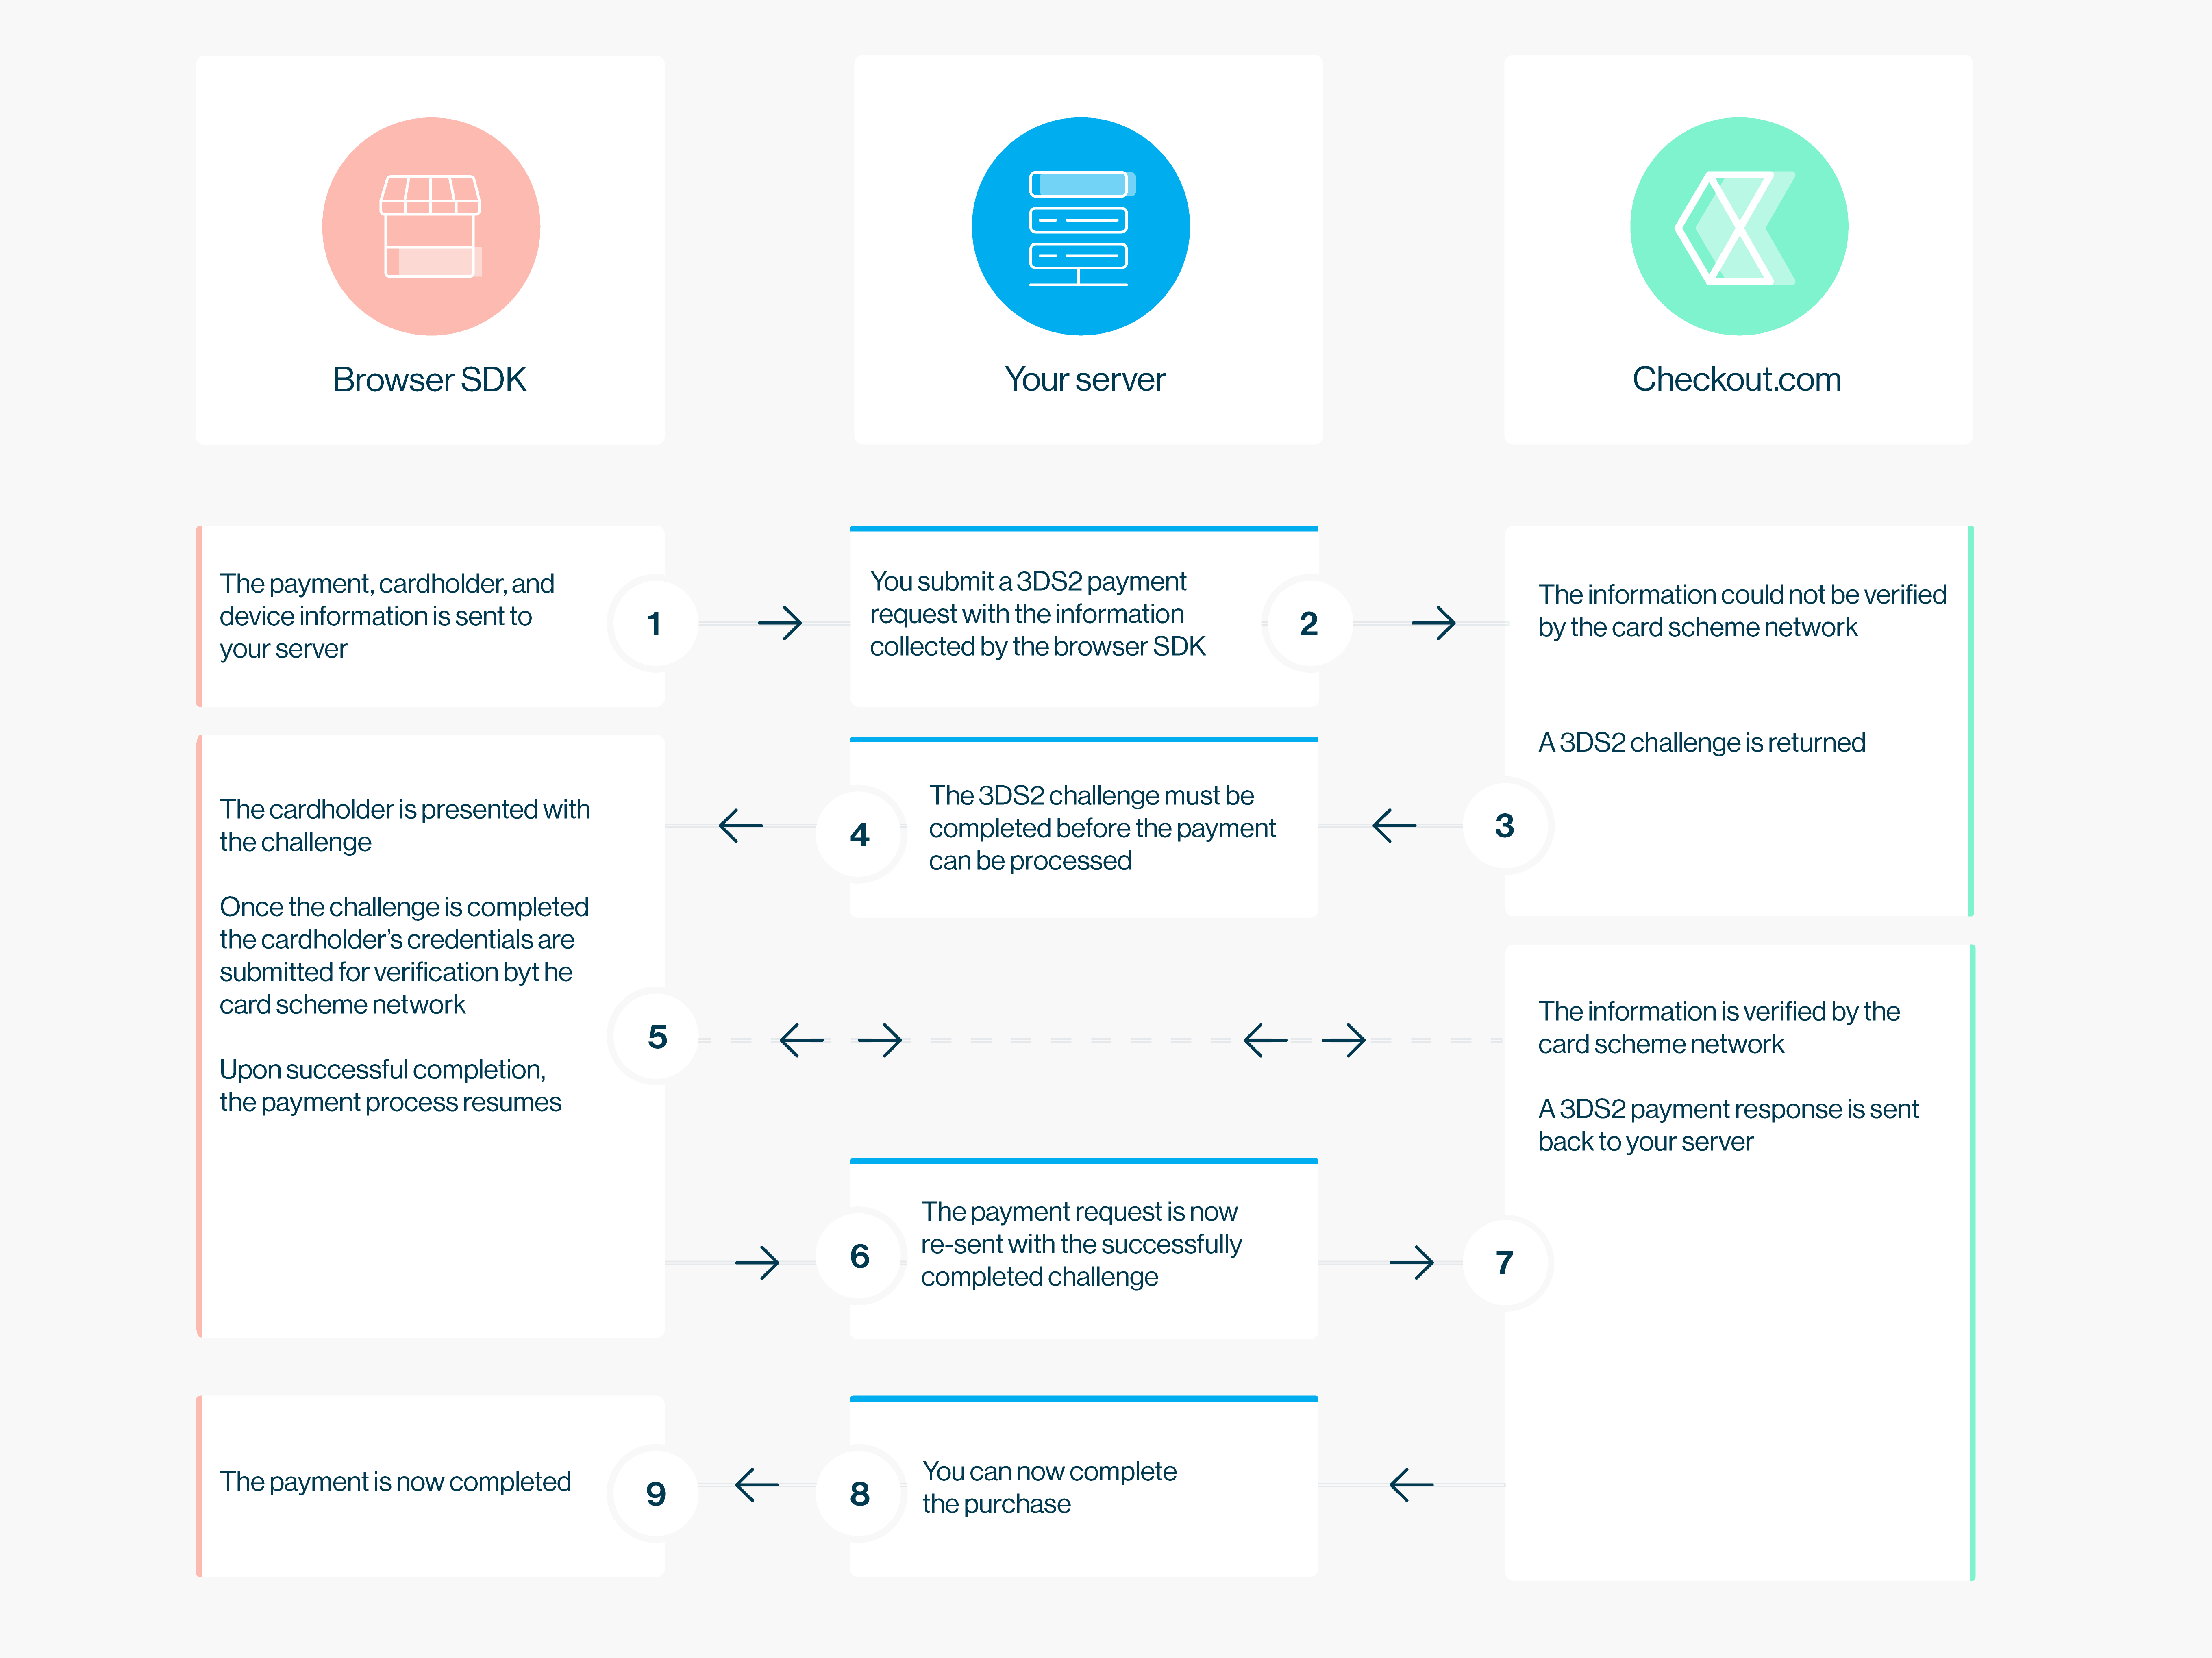
Click to enlarge.
Step 1: Collect a card token
First, the customer needs to exchange their card details for a card token. You can create a card token with one of our integration options.
Step 2: Submit a payment request
As in the frictionless flow example above, use the card token to request a payment using the request a card payment endpoint, making sure to include "3ds.enabled": true.
3DS test cards
If you want to test 3DS authentication flows and transaction statuses in the sandbox environment, use our test cards.
Step 3: Identify your customer
If a challenge is requested by the issuer, you will receive a 202 Accepted response containing a redirect link that you should redirect your customer to.
{
  "id": "pay_hehfmlkpykeupofyxf7nbr6yyy",
  "status": "Pending",
  "customer": {
    "id": "cus_u4a4zosnrw7ehhzr7jipbkdzo4"
  },
  "3ds": {
    "downgraded": false,
    "enrolled": "Y"
  },
  "_links": {
    "self": {
      "href": "https://api.sandbox.checkout.com/payments/pay_hehfmlkpykeupofyxf7nbr6yyy"
    },
    "redirect": {
      "href": "https://sandbox.checkout.com/api2/v2/3ds/acs/sid_feixbit6us3utfedjulm6egnsu"
    }
  }
}
The customer will then be prompted to verify their identity — generally with a password, though it could also be a one-time code sent to them via SMS, or another sort of identity challenge.
Redirection URLs
You can configure redirection success and redirection failure URLs in your Hub dashboard or in the payment request itself by setting thesuccess_urlandfailure_urlfields.
Step 4: Verify the payment with the session ID
When the customer is redirected back to your site, a cko-session-id querystring parameter is provided at the end of the success URL.
It'll look something like this:
http://example.com/success?*cko-session-id=sid_ubfj2q76miwundwlk72vxt2i7q*
Once you've got the cko-session-id, you can use our get payment details API to determine whether the payment was approved, as in the example above.
Non-3DS authorization request flows
Successful non-3DS authorization request flow
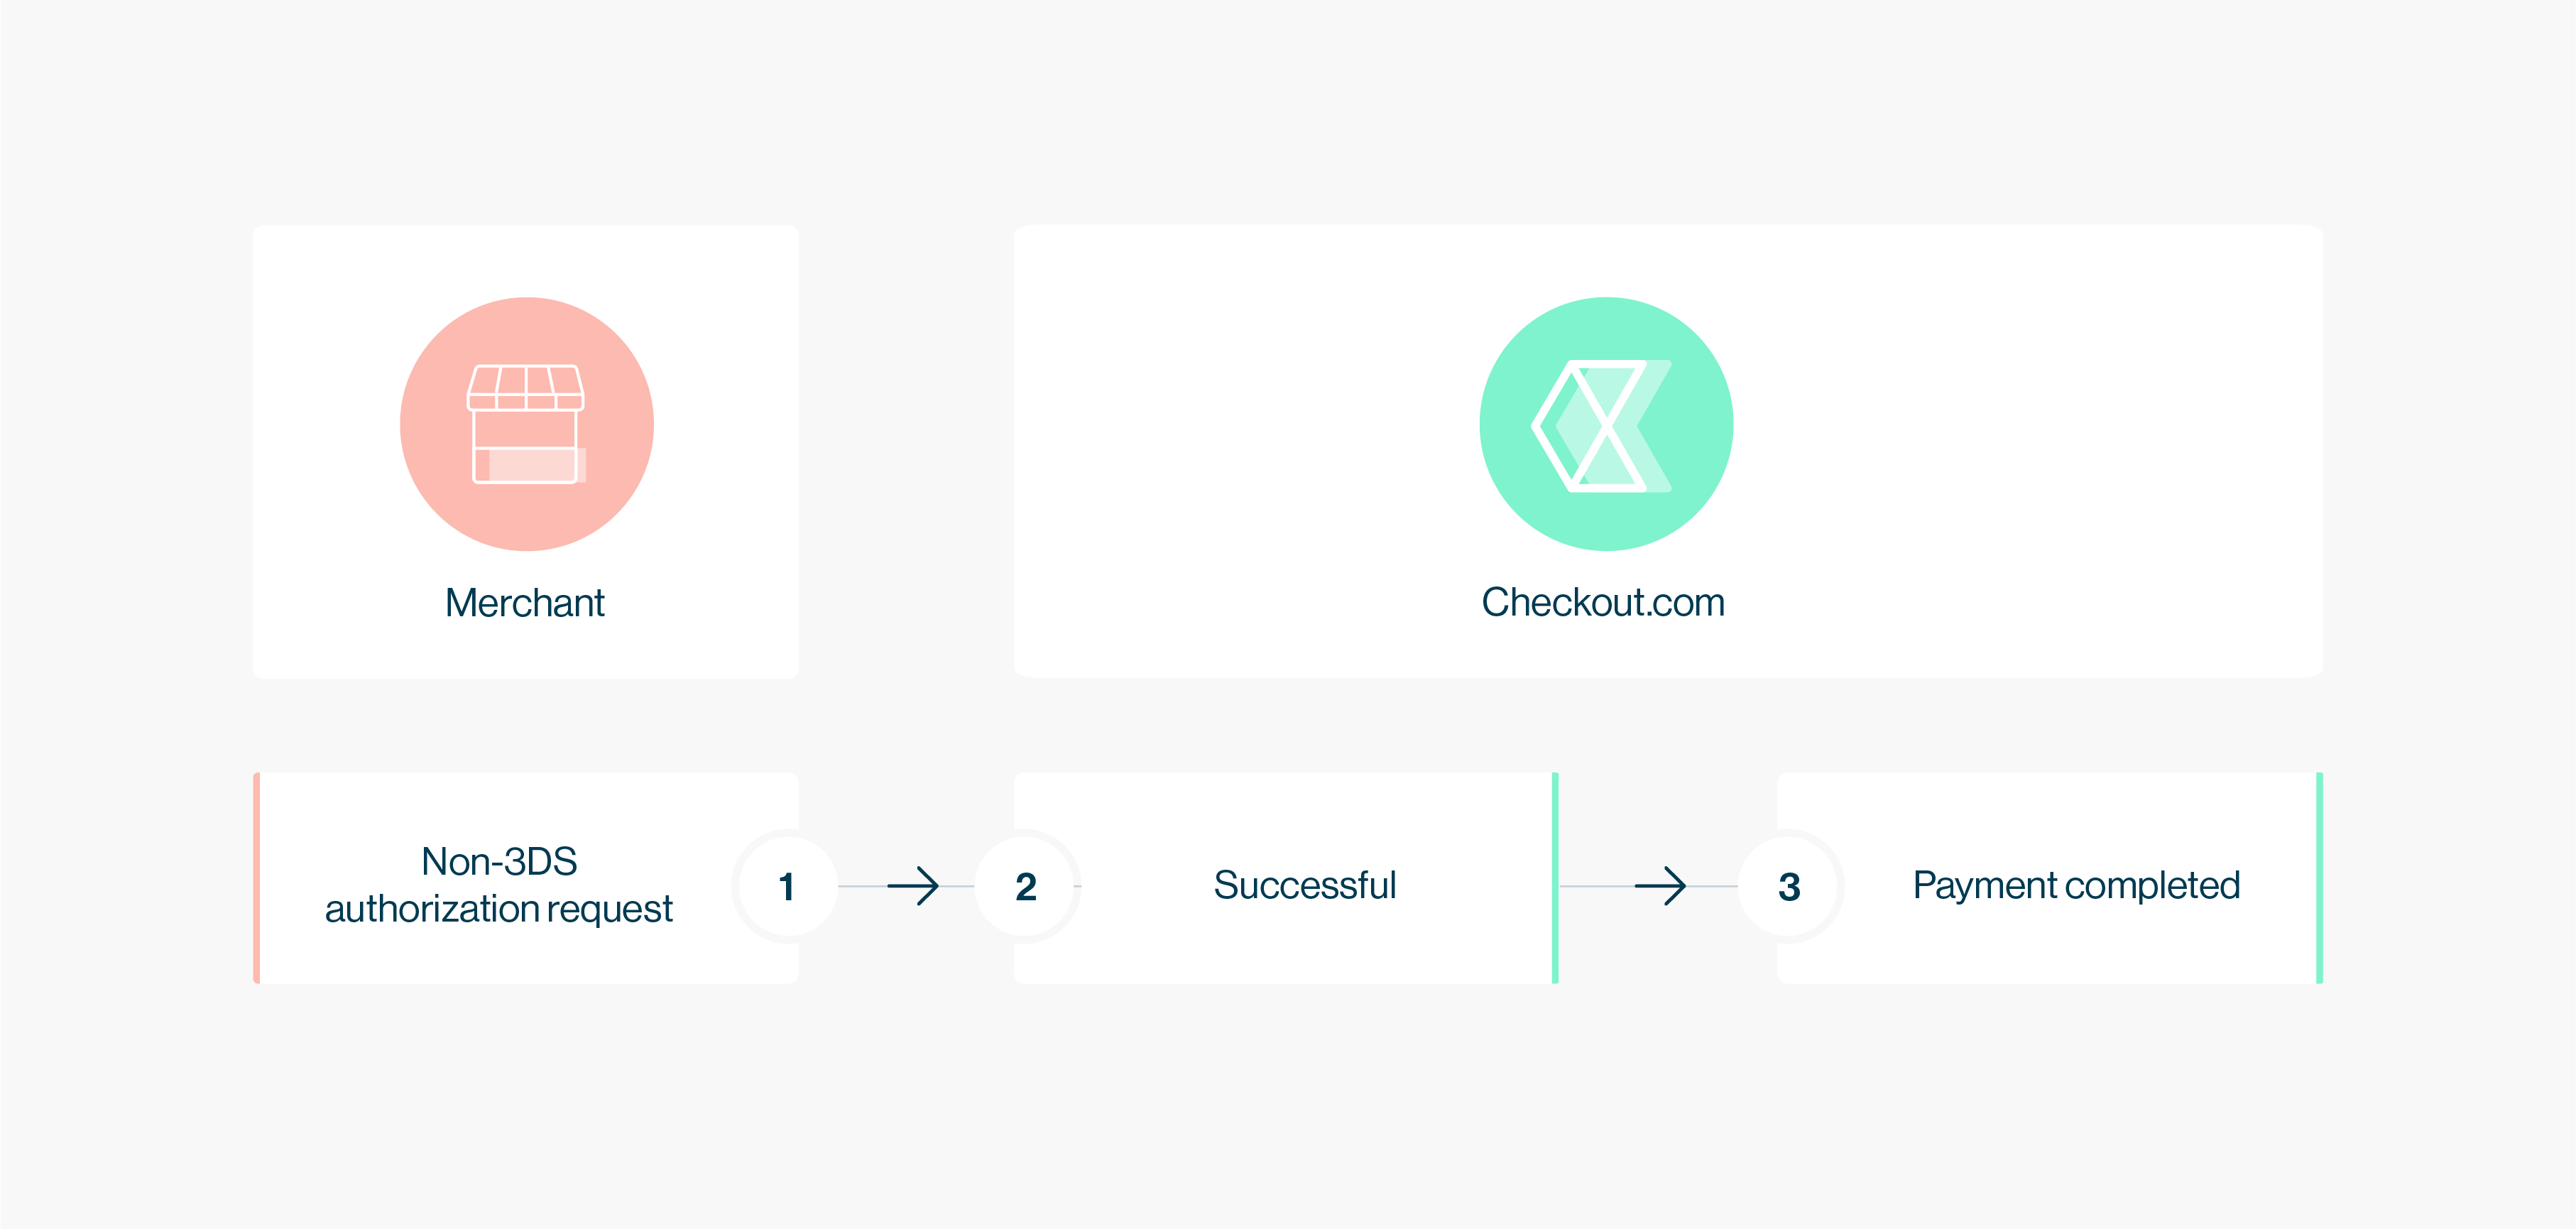
Click to enlarge.
If you make a payment request without the 3ds object, or with "3ds.enabled": false, and the issuer does not require 3DS authorization for the transaction, the payment will complete successfully.
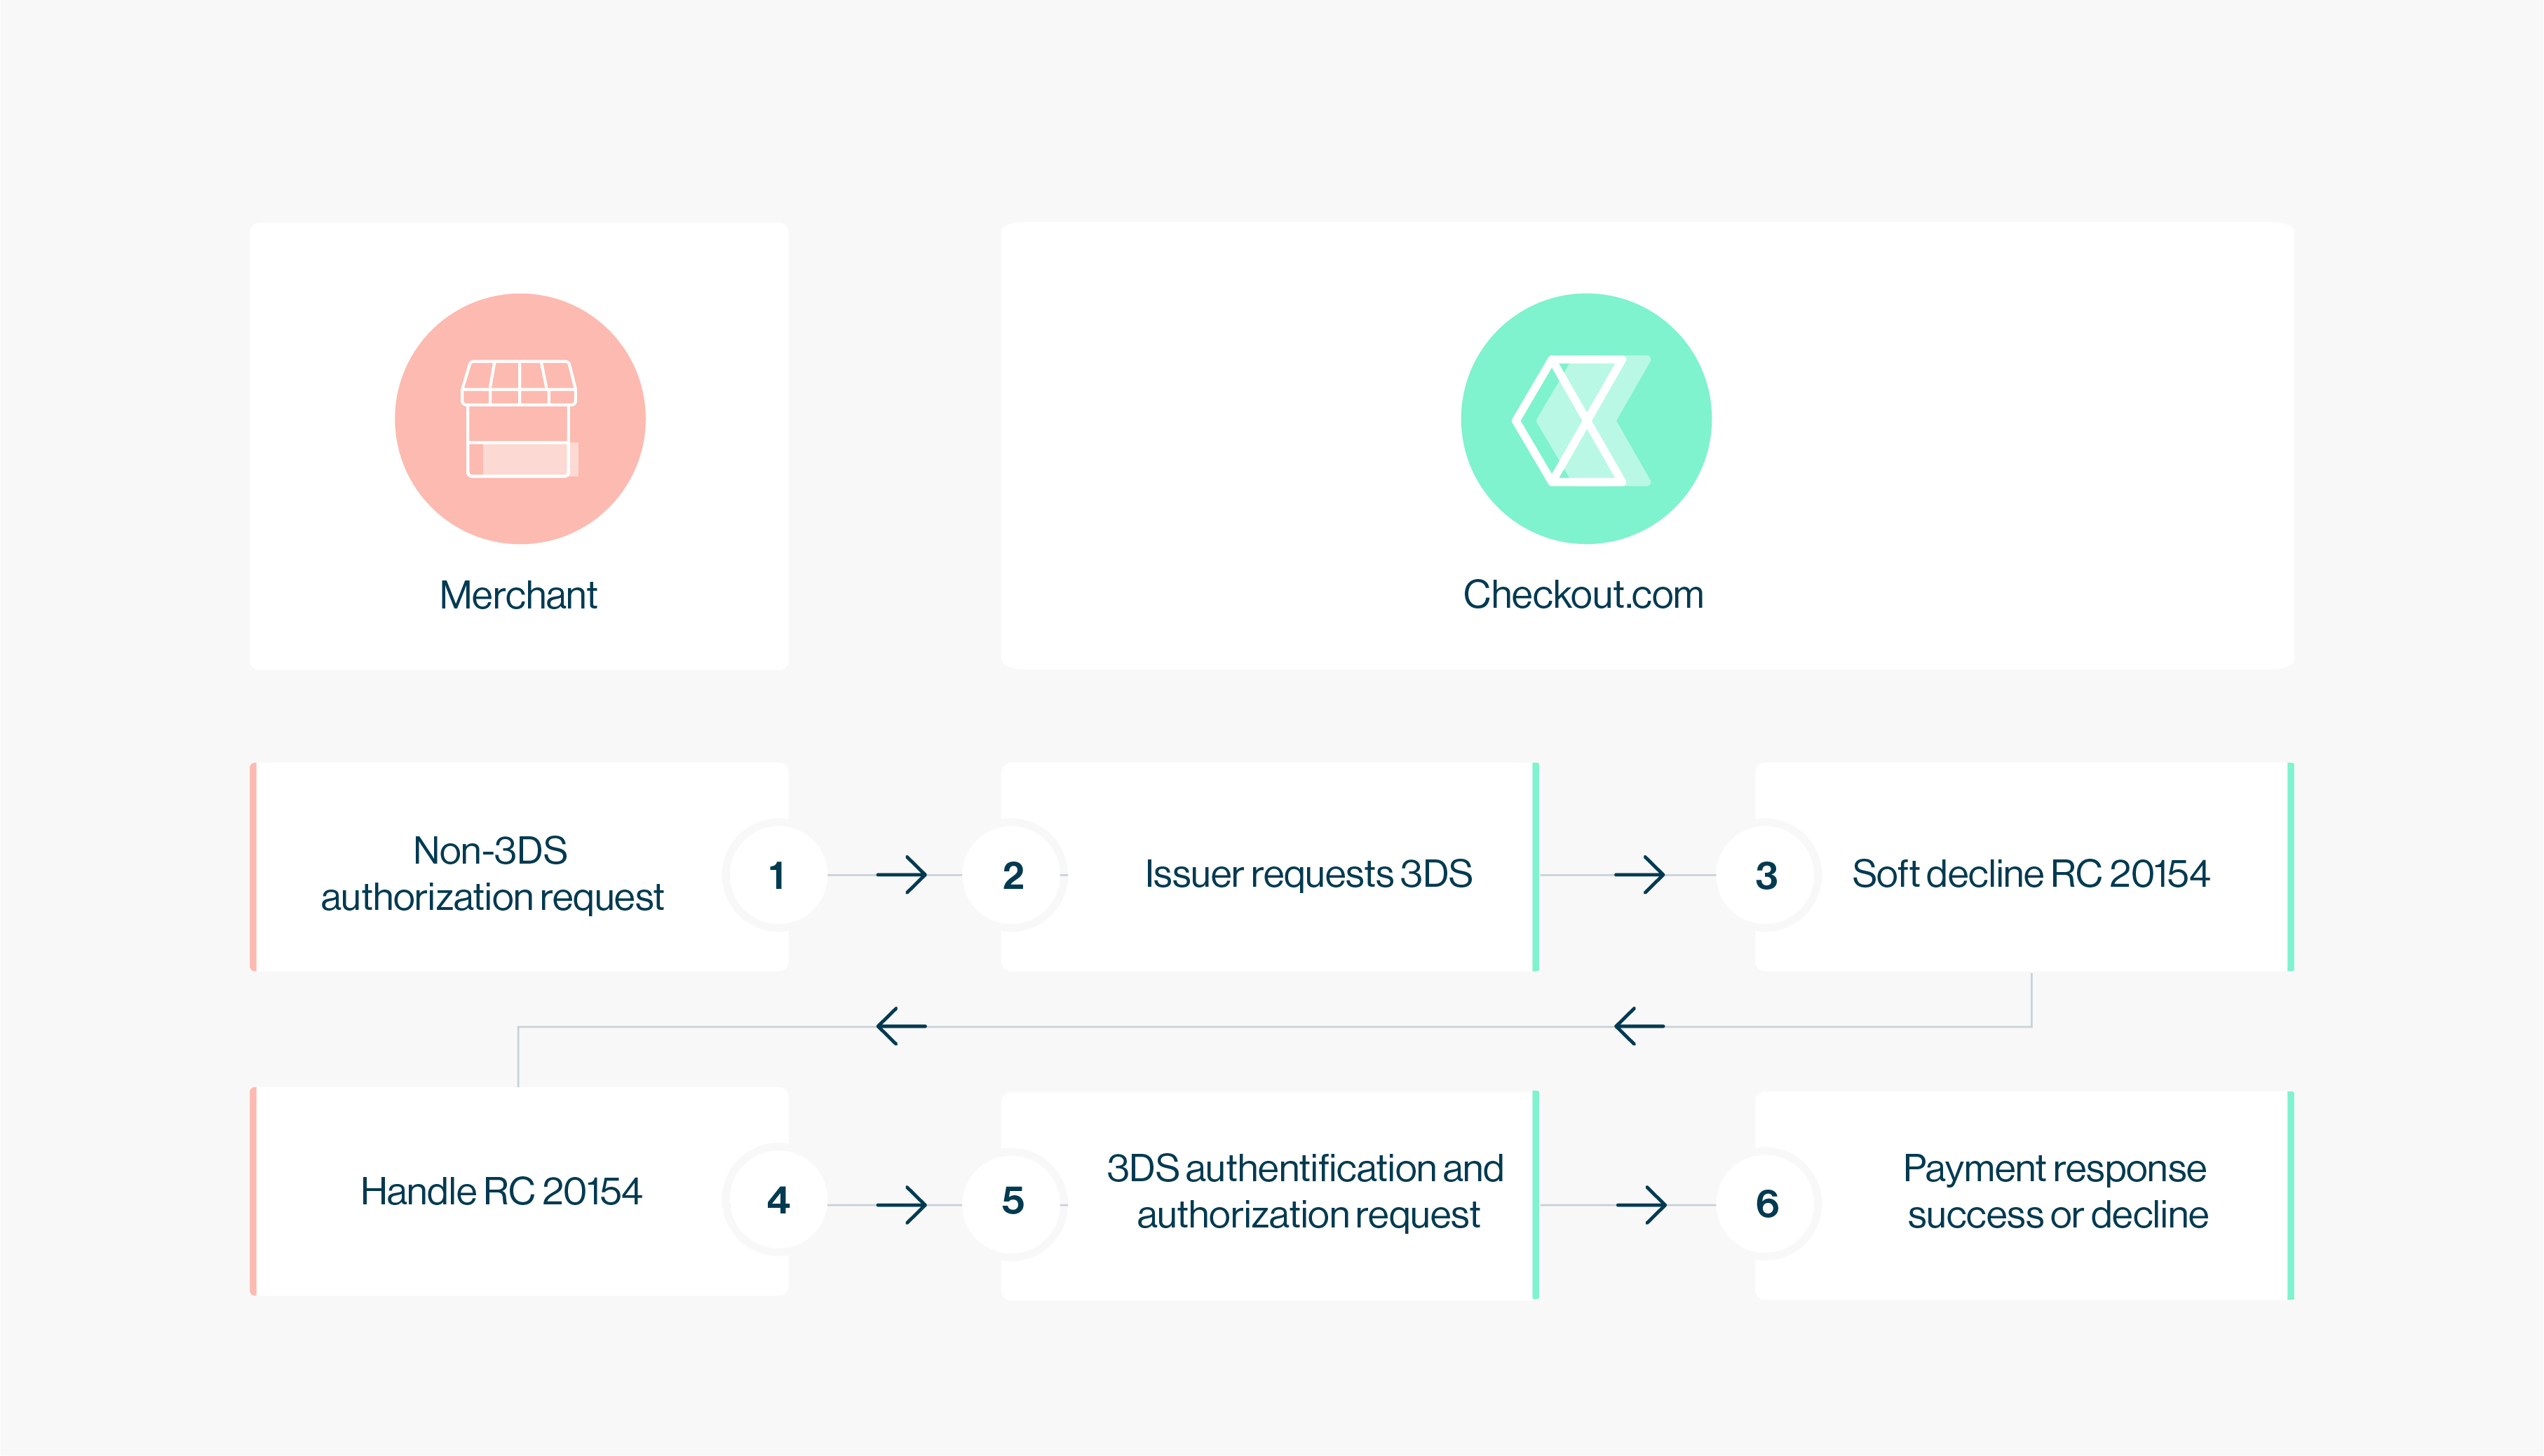
Non-3DS authorization request flow with soft decline
Click to enlarge.
If, however, you make a payment request without the 3ds object, or with "3ds.enabled": false, and the issuer does require 3DS 2.0 authorization for the transaction, you will receive a soft decline response (response code 20154). You will then need to resubmit the payment as a 3DS 2.0 payment, as set out above.
Handling non-enrolled cards
If the issuer does not support the 3DS version, or does not support 3DS at all, we will attempt to process the payment as 3DS. If the card is not enrolled with 3DS, you can automatically downgrade the transaction to non-3DS by using the attempt_n3d field, as shown below.
If you downgrade the payment to non-3DS, the liability shift advantage of 3DS 2.0 will not apply, meaning you will not be protected against potentially fraudulent payments or chargebacks.
{
  "source": {
    "type": "token",
    "token":"tok_vtvlbgpyoaaubmldynpm32bali"
  },
  "amount": 2000,
  "currency": "USD",
  "3ds": {
    "enabled": true,
    "attempt_n3d": true
  }
}
Can we help?
Thanks for using Checkout.com. If you need any help or just have a question, please contact our support team at [email protected].
Updated 8 months ago