Frames
Start accepting online payments in just a few minutes with Frames. It's quick and easy to integrate, accepts online payments from all major credit cards, and is customizable to your brand.
The new version of Frames was released on July 12 2019. If you'd like to upgrade from the old version, simply follow our migration guide. If you need access to the legacy documentation, please contact our support team.
How it works
-
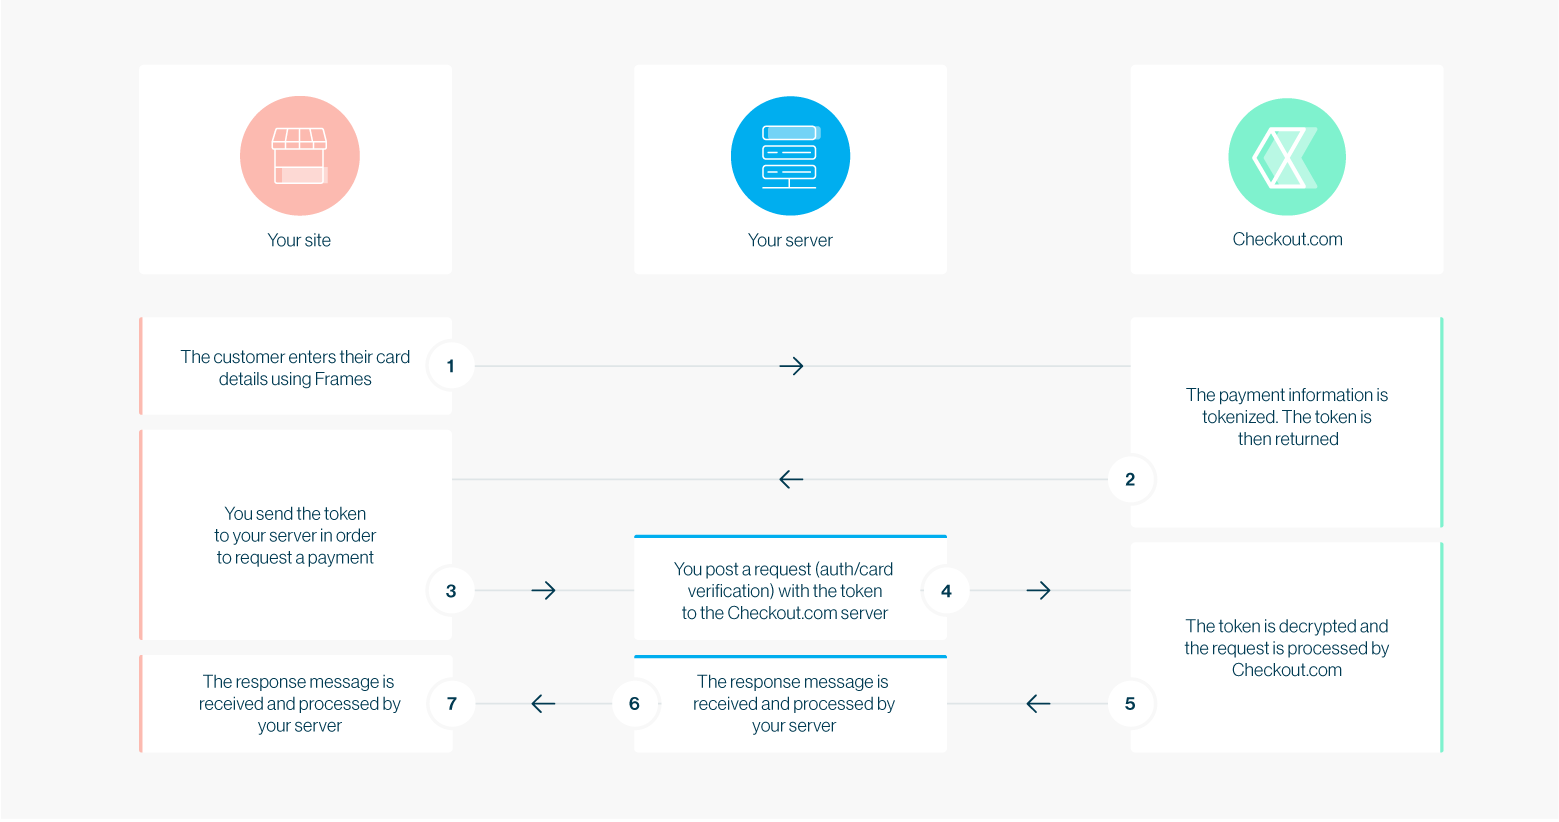
You embed the Frames payment form in your website. The customer then enters their payment details directly on your checkout page.
-
From Frames, your customer's sensitive information is processed by us and exchanged for a token. This process is called tokenization. Once you have the card token, you're ready to make the payment request.

Click to enlarge.
Try it out
Use one of our test cards and corresponding CVV to try Frames out for yourself. For example 4242 4242 4242 4242 with CVV 100.
You can use any expiry date (mm/yy), as long as it's in the future.
Integrate Frames
Before you start
Make sure you have your public_key. You can find it in the Hub, under Settings > Channels. If you don't have an account with us yet, you can request a free test one at Checkout.com.
Add the code snippet to your site
The following code snippet is the start of the payment process and allows you to tokenize a customer's sensitive card information using Frames. Simply copy it and add it to your checkout page, replacing the supplied publicKey with your own. The card token will be posted via the URL specified in the form's action attribute.
<!DOCTYPE html>
<html lang="en">

<head>
  <meta charset="utf-8">
  <meta name="viewport" content="width=device-width, initial-scale=1.0">
  <title>Checkout Frames v2</title>
  <style>*,*::after,*::before{box-sizing:border-box}html{padding:1rem;background-color:#FFF;font-family:-apple-system, BlinkMacSystemFont, 'Segoe UI', Roboto, Oxygen, Ubuntu, Cantarell, 'Open Sans', 'Helvetica Neue', sans-serif}#payment-form{width:31.5rem;margin:0 auto}iframe{width:100%}.one-liner{display:flex;flex-direction:column}#pay-button{border:none;border-radius:3px;color:#FFF;font-weight:500;height:40px;width:100%;background-color:#13395E;box-shadow:0 1px 3px 0 rgba(19,57,94,0.4)}#pay-button:active{background-color:#0B2A49;box-shadow:0 1px 3px 0 rgba(19,57,94,0.4)}#pay-button:hover{background-color:#15406B;box-shadow:0 2px 5px 0 rgba(19,57,94,0.4)}#pay-button:disabled{background-color:#697887;box-shadow:none}#pay-button:not(:disabled){cursor:pointer}.card-frame{border:solid 1px #13395E;border-radius:3px;width:100%;margin-bottom:8px;height:40px;box-shadow:0 1px 3px 0 rgba(19,57,94,0.2)}.card-frame.frame--rendered{opacity:1}.card-frame.frame--rendered.frame--focus{border:solid 1px #13395E;box-shadow:0 2px 5px 0 rgba(19,57,94,0.15)}.card-frame.frame--rendered.frame--invalid{border:solid 1px #D96830;box-shadow:0 2px 5px 0 rgba(217,104,48,0.15)}.success-payment-message{color:#13395E;line-height:1.4}.token{color:#b35e14;font-size:0.9rem;font-family:monospace}@media screen and (min-width: 31rem){.one-liner{flex-direction:row}.card-frame{width:318px;margin-bottom:0}#pay-button{width:175px;margin-left:8px}}</style>
</head>

<body>

  <!-- add frames script -->
  <script src="https://cdn.checkout.com/js/framesv2.min.js"></script>

  <form id="payment-form" method="POST" action="https://merchant.com/charge-card">
    <div class="one-liner">
      <div class="card-frame">
        <!-- form will be added here -->
      </div>
      <!-- add submit button -->
      <button id="pay-button" disabled>
        PAY GBP 24.99
      </button>
    </div>
    <p class="success-payment-message"></p>
  </form>

  <script>
    var payButton = document.getElementById("pay-button");
    var form = document.getElementById("payment-form");

    Frames.init("pk_test_6ff46046-30af-41d9-bf58-929022d2cd14");

    Frames.addEventHandler(
      Frames.Events.CARD_VALIDATION_CHANGED,
      function (event) {
        console.log("CARD_VALIDATION_CHANGED: %o", event);

        payButton.disabled = !Frames.isCardValid();
      }
    );

    Frames.addEventHandler(
      Frames.Events.CARD_TOKENIZED,
      function (event) {
        var el = document.querySelector(".success-payment-message");
        el.innerHTML = "Card tokenization completed<br>" +
          "Your card token is: <span class=\"token\">" + event.token + "</span>";
      }
    );

    form.addEventListener("submit", function (event) {
      event.preventDefault();
      Frames.submitCard();
    });
  </script>

</body>

</html>
Make Frames your own
Customization
Although we kept our demo simple, you have a lot of control over the appearance of your form — from the colours and styling, to whether you want to display one input field or several. Check out our customization guide for more details and examples.
Configuration options
You'll find a list of all the possible configuration options in our Frames reference guide.
Next step
Now that you've got your card token, you're ready to request your first card payment.
Start testing
Ready to try out your integration? Create a test account to get everything working perfectly before going live.\ Get test account
Can we help?
Thanks for using Checkout.com. If you need any help or support, then message our support team at [email protected].
Updated 8 months ago